
The best networks are the ones engineered to meet service level agreements (SLAs). Experienced network engineers put in so much work into making sure that their networks are designed to provide for load balancing and automatic failover. This does not only enhance browsing experience by speeding up the link but reduces downtime.
I am going to show you how you can set up your network to loadbalance across dual ISP links while making sure that all traffics go to the other ISP if one of the links fails. For this configuration, I am assuming you have two equal costs to the internet on both links. I will using a Cisco 3660 router on two links of 1Mbps each. So lets jump in!
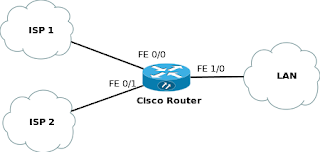
From the network diagram above, we have two internet links. One is on network 172.16.1.0/30, connected to f0/0 while the other is on 172.16.2.0/30, connected to f0/1. Our LAN is network 192.168.1.0/24, connected to f1/0. Our objective is to configure equal cost load balancing across the two ISP links and set up automatic failover in a way that one link takes over should in case the other fails for any reason. The system returns to load balancing when the failed link comes back on. The configuration will be done on the Cisco 3660 router. So lets jump in! Let’s have a look on the network topology we are working with.

See how to configure automatic failover on a Mikrotik router.
I am going to assume that you have configured your IPs, default route, NAT, and all the necessary configurations required to access the internet on either of the links. To set up loadbalancing, here are the commands:
timigate(config)#ip cef
timigate(config)#ip sla minitor 1
timigate(config-sla-monitor)#type echo protocol ipIcmEcho 8.8.8.8 source-int f0/0 (as long as this IP is reachable, the router will continue to send packets to ISP1 )
timigate(config-sla-monitor)#frequency 30
timigate(config-sla-monitor)#time-out 1000
timigate(config-sla-monitor)#thresh 250
timigate(config-sla-monitor)#exit
timigate(config)#ip sla monitor schedule 1 life forever start-time now
timigate(config)#ip sla monitor 2
timigate(config-sla-monitor)#type echo protocol ipIcmpEcho 4.2.2.1 source-int f0/0 ( this is a second IP tested on the same interface just to be sure that the internet is really down, not 8.8.8.8. When the two IPs are unreachable, we are sure the internet is down on this link)
timigate(config-sla-monitor)#frequency 30
timigate(config-sla-monitor)#time 1000
timigate(config-sla-monitor)#thresh 250
timigate(config-sla-monitor)#exit
timigate(config)#ip sla monitor schedule 2 life forever start-time now
timigate (config)#ip sla monitor 3
timigate(config-sla-monitor)#type echo protocol ipIcmpEcho 4.2.2.2 source-int f0/1
timigate(config-sla-monitor)#frequency 30
timigate(config-sla-monitor)#time 1000
timigate(config-sla-monitor)#thresh 250
timigate(config-sla-monitor)#exit
timigate(config)#ip sla monitor schedule 2 life forever start-time now
timigate(config-sla-monitor)#type echo protocol ipIcmEcho 4.2.2.3 source-int f0/1
timigate(config-sla-monitor)#frequency 30
timigate(config-sla-monitor)#time-out 1000
timigate(config-sla-monitor)#thresh 250
timigate(config-sla-monitor)#exit
timigate(config)#ip sla monitor schedule 1 life forever start-time now
timigate(config-track) #track 2 rtr 2 reachability
timigate(config-track)# track 3 rtr 3 reachability
timigate(config-track)# track 4 rtr 4 reachability
timigate(config-track)#track 10 list boolean or
timigate(config-track)#object 1
timigate(config-track)#object 2
timigate(config-track)#track 20 list bool or
timigate(config-track)#object 3
timigate(config-track)#object 4Next we configure per packet sharing on our interfaces . See below:
timigate(config)#int f0/0
timigate(config-if)#ip load-sharing per-packet
timigate(config-if)#int f0/1
timigate(config-if)#ip load-sharing per-packet
timigate(config-if)#int f1/0
timigate(config-if)#ip load-sharing per-packetThe next module takes care of the static route that restrict packet forwarding to 8.8.8.8 4.2.2.1 to ISP1 and 4.2.2.2 and 4.2.2.3 to ISP2. This way, when ISP1 is down 8.8.8.8 and 4.2.2.1 will remain unreachable even when ISP2 is up and internet is up. This will keep the router from forwarding packets to ISP until it comes back up.
timigate(config)#ip route 8.8.8.8 255.255.255.255 172.16.1.1 permanent
timigate(config)#ip route 4.2.2.1 255.255.255.255 172.16.1.1 permanent
timigate(config)#ip route 4.2.2.2 255.255.255.255 172.16.2.1 permanent
timigate(config)#ip route 4.2.2.3 255.255.255.255 172.16.2.1 permanent
Notice that the first two are being forwarded to ISP1 while the other two go to ISP2. That is because the first test connectivity through ISP1 while the other two do the same through ISP2.
Finally, we set the default routes for packets leaving our network. All the uploads will go through ISP1 but the downloads will be shared. If ISP1 goes down, the uploads will go to ISP2. See below:
timigate(config)#ip route 0.0.0.0 0.0.0.0 172.16.1.1 track 10
timigate(config)#ip route 0.0.0.0 0.0.0.0 172.16.2.1 track 20
On some routers, like the 2911, the commands may be slightly different. You have any challenge on this, just send a mail or drop a comment. Thank you for reading this till the end and please, like our page and follow us on twitter.
Hi, the whole thing is going sound here and ofcourse every one is sharing data, that’s genuinely excellent, keep up writing.
I need same config for my 2921 router, will this do or i need to change it…
Thankyou,
Imran Kashmiri
Yes, it will work for your 2921 router.