
Today, I am going to share with us on how to set up Mikrotik site to site Ipsec VPN. Assuming you have a branch office that needs to connect to the head office for ease of communication and file sharing, then you need a VPN connection. Even though this solution can be achieved using any of the routing protocols out there, data encryption is very important and as such, you need to encryption the communication between the two locations using Ipsec.
Internet Protocol Security (Ipsec) is a network protocol that authenticates network devices and encrypt the communications between network devices. While there are different types of VPN, Ipsec VPN is by far one of the best options available out there, and its supported by a lot of vendors in the industry.
You may like How to set up IPIP Tunnel on Mikrotik routers
To achieve this, I have created the scenario below:
Head office. Branch office.
WAN IP: WAN IP:
197.255.220.6/30 197.255.231.18/30
197.255.220.6/30 197.255.231.18/30
LAN IP: 192.168.1.0/24 LAN IP: 192.168.11.0/24
Our objective is to configure Mikrotik site to site IPSEC VPN and ensure that local users are able to communicate among themselves even though they may be countries apart. An Ipsec tunnel will be setup anytime there is a communication between the two locations and data encryption will be activated.
Requirements:
Unlike Cisco, the smallest Mikrotik device can handle VPN setup. For this demonstration, I am using a cloud core- CCR 1009-8G-15-PC, though an RB 750 can do it. If all requirements for internet access have been met and you have connectivity up to the public IP on the remote router, then you are ready to set up Ipsec VPN.
You also like: Easy way to configure Mikrotik L2TP VPN for Remote users

Setting up Ipsec VPN on the Head office router:
Click on IP>>Ipsec>>Proppsal and click on add (+). Choose MD5 for authentication, and Camellia- 128 for encryption, and set the PFS group to modp 1024. U can change the name of the proposal if you will be creating more than one proposals, otherwise, leave it at default. Kindly note that any other authentication and encryption options can be used, just make sure your choices are the same on both routers. See image below:

To set Policy, click on IP>>Ipsec>>Policy and click on add. Type in your LAN network address in the space for source address and the branch office network address in the space for destination address. See below.

Next, click on the action tab and enter the public IP on the head office router as source IP and the one on the branch office router as the destination IP. Don’t forget to tick the box to enable tunnel. Since I edited the default proposal instead of creating a new one, I left the proposal at default. See below:

Next, click on the peer tab and click on add(+). In the space for address, put the WAN IP of the branch office router (be sure you have connectivity to this IP address, otherwise this will not work), put the WAN IP of the head office office router in the space for local address, enter your secrete keys which must be the same on both routers. See the image below and make sure your options match those highlighted in red in the image.
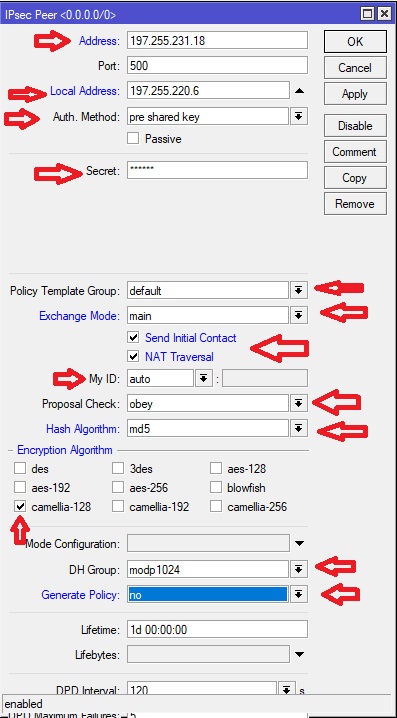
The NAT traversal option makes sure that your LAN to LAN traffics are excepted from NAT. If you already have these traffics excepted from your NAT, then you need not check the box for NAT traversal.
If you have followed the steps correctly up to this point, congrats! you are half way done. Now, repeat the steps above on the branch office router, substituting the source and destination IPs. Everything else is the same except the IPs. If you do everything correctly on the Branch office router, you will have your Mikrotik site to site IPSEC VPN up and running at the end.
Testing Mikrotik site to IPSEC VPN.
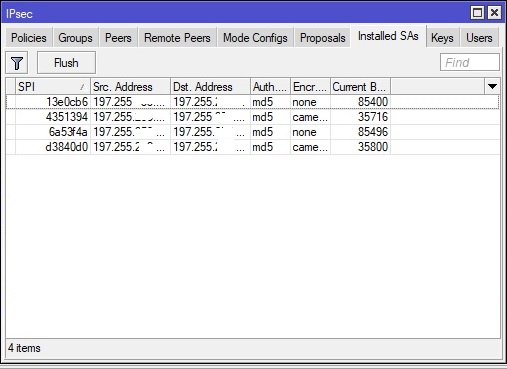
To test the functionality of our Mikrotik site to site IPSEC VPN, I will simply connect systems to both LANs and ping across. To know if your Ipsec tunnel is encrypting your LAN to LAN communications, click on installed SAs in the Ipsec section. You should get an output similar to what is displayed in the image below.
I will be making a video on this shortly. Please subscribe to my YouTube channel here to get it as soon as it’s published. There are lots of other videos on Mikrotik and Cisco networking already published on the channel for you to watch and learn from.
Please comment on any topic you need help and clarifications on. Thanks for reading and stay safe.
If you enjoyed this tutorial, please subscribe to this blog to receive my posts via email. Also subscibe to my YouTube channel, like my Facebook page and follow me on Twitter.
Thanks