
a technical term used in placed of the word redirection. Port-forwarding is
used to describe a situation where communication request to one address and
port number is redirected to another IP address as the packets are passing
through the gateway. This is done using the Network Address Translation, popularly
referred to as NAT. In this article, I will demonstrate how to configure
port-forwarding on a Mikrotik router to redirect all HTTP request to the public
IP address on your router to the web server or DVR connected to your local area
network.
or port-mapping as it is sometimes called, you need to have the following
ready:
server or DVR
uses TCP port 80)
you are ready for the next phase, which is the configuration proper.
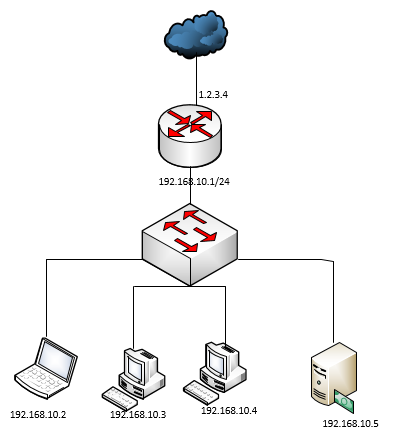
seen in the image above, the router’s public IP for this demonstration is
1.2.3.4 while hosts on the LAN are assigned IP addresses from a private subnet
with the server assigned 192.168.10.5. As a security measure, the server was
not assigned a public IP yet, we want to be able to access it from the
internet. Make sure the IP address on your servers are not DHCP-assigned.
You may like: How DHCP-assigned address almost got me fired; true life story.
The same scenario is what plays out when you have a DVR with cameras connected to it. The DVR is given a private IP from your LAN but you want to be able to access it and view your cameras even when you are out of your network. The next step will show you how to implement the required configuration on a Mikrotik router for you to be able to access your web server or DVR over the internet even though it is assigbed a private IP.
Once the basic configuration required for your router to access internet have been met, follow the steps below to configure port-forwarding:
You may like: Three basic things you must do to successfully configure a Mikrotik router for internet access.
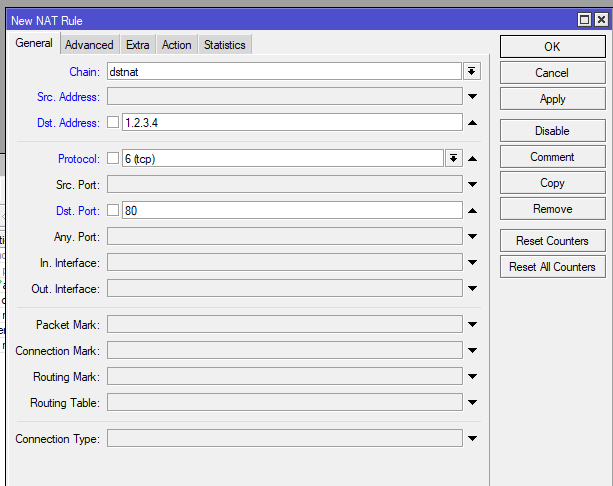
Copy, edit and paste the below command into the new terminal window on your Mikrotik router:
dst-address=1.2.3.4 dst-port=
to-addresses=192.168.10.5
Click on action and enter values as shown in the image below.
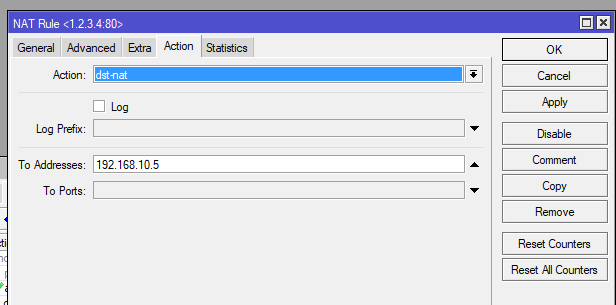
Click on apply and Ok. That’s it! you are done. On any computer or smartphone with internet access (NOT connected to your network), open a web browser and enter the public IP on your router and hit the enter key, you should be redirected to the web server or the DVR as the case may be.