
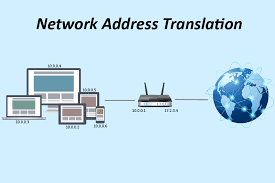
NAT is a feature that allows internet access for users who are connected using private addresses. Because IP version 4 only provides about 4.2 billion addresses, which is below the required number of IP addresses for devices that need to be connected to the internet, NAT was introduced to allow a group of users who have been assigned IP addresses from the private address blocks, to share one or more public IP addresses for traffics that are internet-bound. In this article, we will look as the good and bad side of NAT as well as its configuration on a Cisco router.
Advantages of NAT
>> NAT helps in the conservation of IP addresses, making sure we haven’t run out of them since. Allowing multiple users to share one public address greatly reduces the number of public IPs required for internet access. Users can use IP addresses from the private address range which will be translated to a public IP address for traffics that are destined to the internet.
>> NAT provides a measure of security by making sure that internal addresses are not exposed to users on the internet. With the private address masqueraded to a public address, users on the internet are fooled into believing that the public IP belongs to the users. This helps prevent denial of service attacks on servers on the network.
You may also like: GNS3 complete setup guide, from start to finish
Disadvantages of NAT:
>> IP Blacklisting. As good as the intention behind the introduction of NAT was, it also comes with lots of issue. Topmost on the list is spamming issues. When you have so many users accessing the internet using the same public IP, innocent users get punished for the wrong reasons. This happens when the public IP becomes blacklisted by an email hosting company as a result of email spamming perpetrated by one of the users on the network. Once this happens, all users on that network will be unable to access their mails.
>> Disruption of network operations. This happens to internet service providers who make use of NAT. An ISP that makes use of NAT will have hundreds of users using one or more public addresses to access resources on the internet. This could cause serious issues when a user engages in a distributed denial of service attacks and the IP gets reported. In such situation, the ISP is expected to identify the erring subscriber and disconnect him/her. With NAT, it is difficult, if not impossible, to identify the erring subscriber on time. Where an ISP is unable to identify the subscriber and the DDOS attacks continue, the case will be escalated to the body responsible for assigning IP addresses to organisation. When this happens, the entire block of public address assigned to the ISP will get blocked, ultimately leading to the death of the ISP.
How to configure NAT on a Cisco router, using command line interface (CLI):
timigate(config)#access-list 1 permit 192.168.1.0 0.0.0.255
timigate(config)#ip nat pool timigate 192.168.2.1 192.168.2.1 netmask 255.255.255.255
timigate(config)#ip nat inside source list 1 pool timigate overload
timigate(config)#int f0/0
timigate(config-if)#ip nat outside
timigate(config-if)#int f0/1
timigate(config-if)#ip nat inside
Explanation
>> The access-list statement captures the block of private addresses to be included in the NAT. The IP here should be your private network.
>> The second defines the pool of public IP addresses. In this example, I have one public IP which was configured on the WAN interface connecting to the ISP. Yes, I know that 192.168.2.1 is not a public IP. I am just using it for this demonstration. The procedure is the same; just change it with a public IP from your ISP. I used 255.255.255.255 because I only have a single public IP and not a block. If you have a block of /29, you can state the beginning and the end with a mask of 255.255.255.248.
>> The third line instructs the router to implement NAT by allowing the private IPs captured in the access-list numbered 1 to have their IPs changed to the one listed in the pool named timigate, as long as their traffics are coming in through the interface declared as inside. The overload keyword tells the router to allow multiple private addresses nat to one public address. The inside interface is the router’s interface connecting to internal network while the outside interface connects to the ISP.