
If you are a Mikrotik user, chances are you have seen the DHCP relay feature severally but do not know what it is used for or how it can be configured. The DHCP relay feature is used to provision a Mikrotitik router to act as a DHCP server on behalf of the real DHCP server. In this piece, we will look it how to configure a DHCP relay to mediate between the dhcp server and dhcp clients.
Network Topology
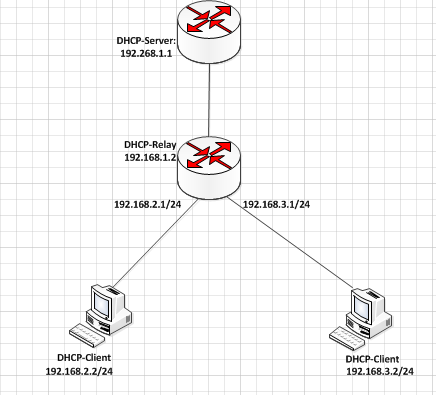
As can be seen in the diagram above, the dhcp server is on the same network with the dhcp relay while the dhcp clients are not on the same network as the dhcp server. The dhcp relay, in turn, is on the same network with the hosts. When a dhcp request is sent from network hosts, the dhcp relay receives it and forwards the request to the dhcp server. The question on most people’s mind at this point is, why do I need a dhcp relay? Why can’t I just configure a dhcp server instead. Well, in a nutshell, a dhcp relay agent is used to forward dhcp requests and replies between a dhcp server and clients who are not on the same subnets.
In this demonstration, I will configure a dhcp server for the two LAN subnets attached to the dhcp relay. Here is how it is done. First, IPs have to be assigned to the interface connecting to the dhcp-relay as shown below.
[admin@DHCP-Server]
ip address> print
ip address> print
Flags: X –
disabled, I – invalid, D – dynamic
disabled, I – invalid, D – dynamic
#
ADDRESS NETWORK BROADCAST INTERFACE
ADDRESS NETWORK BROADCAST INTERFACE
0
192.168.1.1/24 192.168.0.0 192.168.0.255 To-dhcp-Relay
192.168.1.1/24 192.168.0.0 192.168.0.255 To-dhcp-Relay
[admin@DHCP-Server]
ip address>
ip address>
Now, we specify the pools for the two networks connected the dhcp-relay. See below:
/ip pool add name=Local1-Pool ranges=192.168.2.11-192.168.2.100
/ip pool add name=Local1-Pool ranges=192.168.3.11-192.168.3.100
[admin@DHCP-Server]
ip pool> print
ip pool> print
# NAME RANGES
0 Local1-Pool 192.168.2.11-192.168.2.100
1 Local2-Pool 192.168.3.11-192.168.3.100
[admin@DHCP-Server]ip pool>
Next, we create dhcp servers. See below:
/ip dhcp-server add interface=To-dhcp-relay relay=192.168.2.1 address-pool=Local1-Pool name=DHCP-1 disabled=no
/ip dhcp-server add interface=To-dhcp-relay relay=192.168.3.1 address-pool=Local2-Pool name=DHCP-2 disabled=no
[admin@DHCP-Server] ip dhcp-server> print
Flags: X – disabled, I – invalid
# NAME
INTERFACE RELAY ADDRESS-POOL LEASE-TIME ADD-ARP
INTERFACE RELAY ADDRESS-POOL LEASE-TIME ADD-ARP
0 DHCP-1
To-dhcp-relay 192.168.2.1
Local1-Pool 3d00:00:00
To-dhcp-relay 192.168.2.1
Local1-Pool 3d00:00:00
1 DHCP-2
To-dhcp-relay 192.168.3.1
Local2-Pool 3d00:00:00
To-dhcp-relay 192.168.3.1
Local2-Pool 3d00:00:00
[admin@DHCP-Server] ip dhcp-server>
Next, configure the various networks. See below:
/ip dhcp-server network add address=192.168.2.0/24 gateway=192.168.2.1 dns-server=8.8.8.8
/ip dhcp-server network add address=192.168.3.0/24 gateway=192.168.3.1 dns-server=8.8.8.8
[admin@DHCP-Server] ip dhcp-server network> print
#
ADDRESS GATEWAY DNS-SERVER WINS-SERVER DOMAIN
ADDRESS GATEWAY DNS-SERVER WINS-SERVER DOMAIN
0 192.168.2.0/24 192.168.2.1
8.8.8.8
8.8.8.8
1 192.168.3.0/24
192.168.3.1 8.8.8.8
192.168.3.1 8.8.8.8
[admin@DHCP-Server] ip dhcp-server network>
Finally, we set up a relay agent on the dhcp-relay device. See how it is done below:
/ip dhcp-relay add name=LAN1-relay interface=LAN1 dhcp-server=192.168.1.1 local-address=192.168.2.1 disabled=no
/ip dhcp-relay add name=LAN2-relay interface=LAN2 dhcp-server=192.168.1.1 local-address=192.168.3.1 disabled=no
[admin@dhcp-relay] ip dhcp-relay> print
Flags: X – disabled, I – invalid
# NAME INTERFACE DHCP-SERVER LOCAL-ADDRESS
0 LAN1-relay LAN1
192.168.1.1 192.168.2.1
192.168.1.1 192.168.2.1
1 LAN2-relay LAN2 192.168.1.1 192.168.3.1
[admin@DHCP-Relay] ip dhcp-relay>