
Recently, Mikrotik routers have come under heavy attacks by cyber criminals. The recent one among these attacks is the Mikrotik http and dns redirect attack. This attack, one of the many attacks on Mikrotik routers in recent time, redirects all http and dns traffics to a remote proxy/dns server, giving the attackers the power to analyze packets coming from a network.
So many users have experienced this attack and if you are using a Mikrotik router with an assigned public IP address, it is just a matter of time before your device is compromised, except you have taken measures to secure your router.
In this post, we will look the changes made to your router once it experiences Mikrotik http and dns redirect attack, how to clean up your router, and finally, how to secure it from further attacks.
What is Mikrotik http and dns redirect attack?
The Mikrotik http and dns redirect attack is a new form of attack on Mikrotik routers that allows cyber criminals to redirect http and dns traffics from your network to a remote proxy server using udp port 53 and tcp port 80. The attackers assign dns IPs to your router, and create destination nat rules to redirect http and dns traffics.
Once these changes have been made on a Mikrotik router, the perpetrators can sit back and analyze packets from affected networks using a packet analyzer like Wireshark.
How to know that your router has been compromized
An obvious flag that your router has been attacked is that browsing experience through the router suddenly becomes slow even when bandwidth utilization is low. This is because the attackers’ dns/proxy server, to which http and dns traffics have been redirected, may not be designed to withstand the number of packets from compromised Mikrotik routers.
How to clean up your router
When faced with a problem like this, what comes to mind is to reset the router. This option does not completely solve the problem as attackers have files installed on the system. These files do not get erased even when the router is reset.
In a situation like this, a careful evaluation of what has been done is required. After that, user should put in place manual corrective and preventive measures aimed at securing the router.
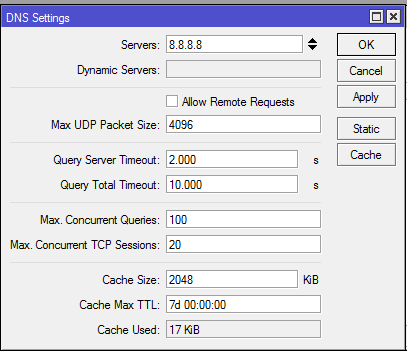
Remove rougue dns server IP address
Remove the rogue dns address assigned to the router. Click on IP>DNS and remove all dns server IP addresses not assigned by you. See guide below:
Remove destination NAT on port 8080
In firewall nat rule, two redirect rules are usually created to redirect http and dns requests to remotes servers. The IP addresses of these servers are usually entered as primary and secondary dns servers in the IP>DNS seb-menu of affected routers. The attackers will configure two destination nat rules to redirect http and dns traffics to these IP addresses.
Click on IP>firewall>NAT, and remove these rules.
Remove all backup files not installed by you
Additional files could be found in the file menu of an affected router. These files remain in the router even after a reset has been performed. Click on file and remove all files not installed by you.
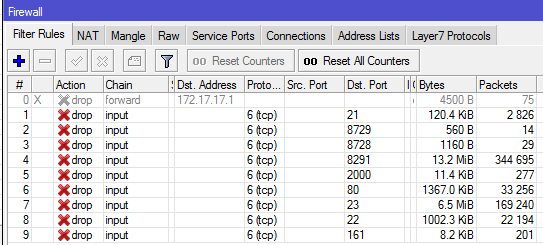
Secure your router from further attacks
To secure your router, create input-chained firewall filter rules that will drop all access to your router via the public IP on selected ports. These ports include 21, 22, 23, 80, 161, etc. See image below.
Read: How to secure Mikrotik routers by blocking port access from the internet
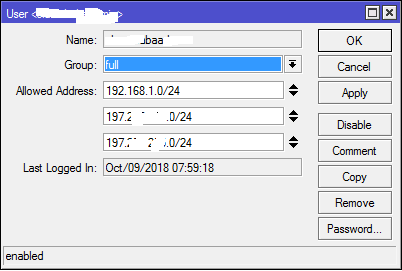
To ensure that only authorised IPs can login to the router, add allowed IPs to users in the user sub-menu. See below.
If you enjoyed this tutorial, please subscribe to this blog to receive my posts via email. Also subscibe to my YouTube channel, like my Facebook page and follow me on Twitter.
A great tutorial, but i’d add: Update your routeros to the latest version.
Rename the admin account and change the password.
Thanks Alex. You are absolutely right.