
Ever had a situation where some users on your network are continually abusing the bandwidth by using it for unauthorizing activitities and thereby making it almost impossible for legitimate user traffics to pass? Mikrotik mangle rule will allow you classify users and allocate bandwidth to these users based on the relivance of their activities to your organization.
Our objective in this lab is to identify and group our top users together and allocate bandwidth to them from the available bandwidth and let the remaining users make use of the remaining bandwith. Our queue will be configured with priority values to ensure that the total subscribed bandwidth becomes available for use if no one from the top users group is on the network. For example; if the subscribed bandwidth is 5mbps, we will allocate 3mbps to the top users group and 2 to everyone else. However, if no user from the top users group is active on the network, the entire 5mbps becomes available for use by everyone else.
What we need to do to achive this: we will identify addresses assigned to members of the top users group either by checking on their devices or by going through the dhcp lease list, for those that can easily be identified. Having identified the ip addresses, we will make their lease static, ensuring that their IP addresses will always remain thesame. Next, we will create and address-list and add their IP addresses to that address-list, then use the Mikrotik mangle rule to mark their download and upload packets. Finally, we will create queues for packets that match the rules created above as well as every other packets. Let’s jump in!
You also like: How to permit l2tp ipsec vpn through Mikrotik firewall
Step 1: Identify IP addresses to be added to group
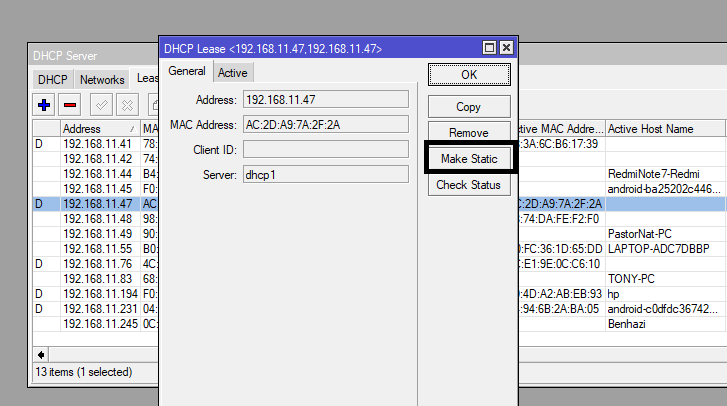
Identify those you want to add to the top users group and get their IP addresses. As stated above, this can be done by finding out from their devices. In an organization where all devices are named, they can easily be identified in the dhcp lease list. After identifying the IP addresses go to dhcp lease, click on the IP and click on make static. Repeat the steps for all the IP addresses you want added to the top users group. See image below.
Step 2: Create an address-list
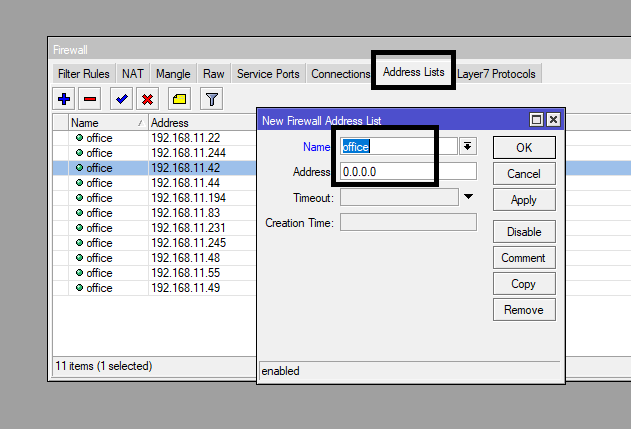
Create an address-list for top users (users whose IP address leases were made static in step 1 above. To creat an address-list, go to ip>firewall>address-list>add. Enter a name for your address-list and add an IP address. Repeat the steps for each ip, making sure that the same address-list is chosen for every IP address entered. See image below.
Step 3: Mikrotik mangle rule
Create two mangle rules to mark download and upload packets for users in the address-list created in step 2 above. To create a mangle rule for upload packets, go to IP>firewall>mangle>add. Set chain to forward, select your LAN interface as the in interface, click on advance and choose the address-list created in step 2 as your source address-list. Click on action and select “mark packet” and enter a name for the packet mark. Click on apply and ok. Repeat the steps for the download packets but this time, select your LAN interface as the out interface and leave the in interface blank. See images below.

The command line code for the two rules are as written below, if you prefer creating it via the CLI:
ip firewall mangle
add chain=forward action=mark-packet new-packet-mark=Top_users_upload passthrough=yes src-address-list=office in-interface=ether5
add chain=forward action=mark-packet new-packet-mark=Top_users_download passthrough=yes dst-address-list=office out-interface=ether5
Step 4: Simple queue
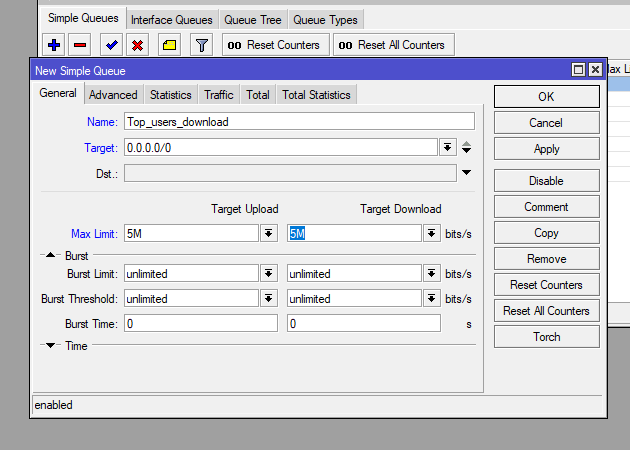
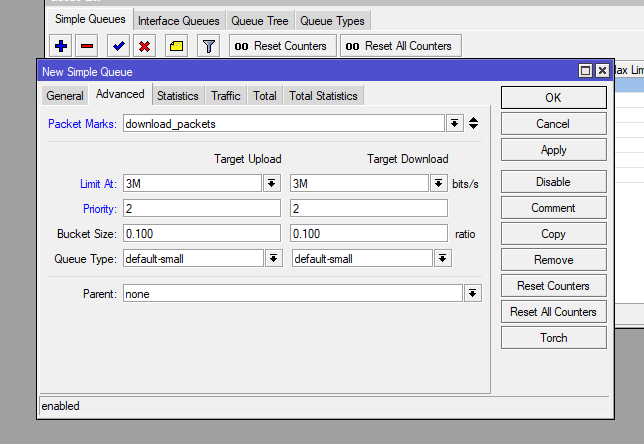
Step 4 is the final step. It is where we configure queues to use the packet marks created in step 3 for bandwidth control. First configure the download queue, then the upload queue. Go to simple queue and click on the add button. Add a name (top_users_download), select max limit bandwidth. The max limit is what they will get if no one from other groups is on the network. Max limit must not be lower that “limit at”. Click on advance, select the download packet in the packet mark list and enter bandwidth values for “limit at” and set the priority value to a number lower than the default value of 8. Note that the lower the better. See image below.
Repeat the steps for the upload traffic but this time, select upload packets in the packet mark section. Finally, still in step three, create a queue for every one else (non-members of the top users group). Still on simple queue, click on add, enter a name, select your LAN interface as the target address, and set the max limit to the subscribed bandwidth; in this case 5mbps. Remember that the max limit is what is available to this group users if the top users are not active on the network. Click on the advance tab and enter figures for the “limit at” bandwidth. In this case, 2mbps. Here, no packet mark is selected. Also, ensure that the priority value for this group is greater than the one set for the top user group.
If you enjoyed this tutorial, please subscribe to this blog to receive my posts via email. Also subscibe to my YouTube channel, like my Facebook page and follow me on Twitter